How to embed Veezoo: a Demonstration
This is a step-by-step guide on how to set up a locally hosted demo website, which has Veezoo embedded. It is meant to give users a first impression on how you could integrate the power of Veezoo into your product. This guide can be viewed as a sort of companion to the embedded Veezoo docs. Those docs are much more general and explain all different options available, as well as all the details already implemented in this demo. This guide repeats some of the points mentioned there, so that this is all you need to set it up. The goal here is not to demonstrate all the details, but to get a clean, working version (with all basic features) up and running as easily as possible.
This project inludes:
- code to host the demo website on your local machine
- a spreadsheet containing the fictional data
1. Requirements
To run this project, you need:
- the code for the website, as well as the spreadsheet with the data (download here). Alternatively you can integrate your own dataset just as well, though this tutorial will assume you use the dataset provided (This will mainly matter in step 5., where it will be mentioned again).
- a Veezoo account that has embedding enabled (contact Veezoo to unlock this feature)
- enough available knowledge graphs (at least 2) and users
- access to a data warehouse like PostgreSQL or Big Query.
Veezoo embedding is not compatible with spreadsheets directly uploaded to Veezoo.
2. Our Demo: the Hyperstore
A short note on the demo we are building: the Hyperstore. The Hyperstore is a fictional online marketplace, where different vendors can sell their products. A lot of products are ordered and shipped to customers all over the US. All these transactions create a lot of data of course, which are saved in three tables: Customer, Order and Product. We are now implementing a back end for our vendors (currently three), which would like to get insights from their data. Now, we as managers of Hyperstore want to give our vendors as much insight as possible, though only about their own transactions. That's why we naturally came to the conclusion, we have to implement Veezoo.
3. Getting started
To get started, upload the hyperstore spreadsheet contained in this repo to your data warehouse (in case you don't want to use your own dataset). If you don't already have one, create a Veezoo account and make sure it includes at least 2 knowledge graphs. Either use a free trial for a higher tier account, or contact Veezoo to enable a second knowledge graphs in your free account. Connect it to your data warehouse, as you would for regular Veezoo usage. You can follow this guide (as mentioned before, connecting to an Excel spreadsheet will not work). Select the data you want to work with and configure it to your desires and ask a couple of questions to ensure that everything is working properly.
Once everything looks fine, contact Veezoo to enable embedding. This can only be done manually by Veezoo.
4. Initial Veezoo Configurations
Once you have been granted access to the embedded option,
open Veezoo Admin and navigate to Embedded >> Configuration and make sure the Toggle Switch is ON (Embedding is enabled).
For secure embedding, you need to specify the allowed hosts. This ensures that your Veezoo content is only accessible from your designated, trusted domains. In our case this means add http://127.0.0.1:5000/ (local host) as an allowed origin.
Veezoo supports JWT for user authentication within Embedded Analytics. To enable secure access to relevant data and analytics, your application will have to generate a JWT on your server and pass it to Veezoo. For that to work, we need to configure in Veezoo Admin the public key for a private key that will be used by your application to sign the token.
If you don't know how to create a key pair, follow the instructions displayed after clicking on Follow the steps below to generate a 2048-bit RSA key pair. Add the public key as text in the corresponding field.
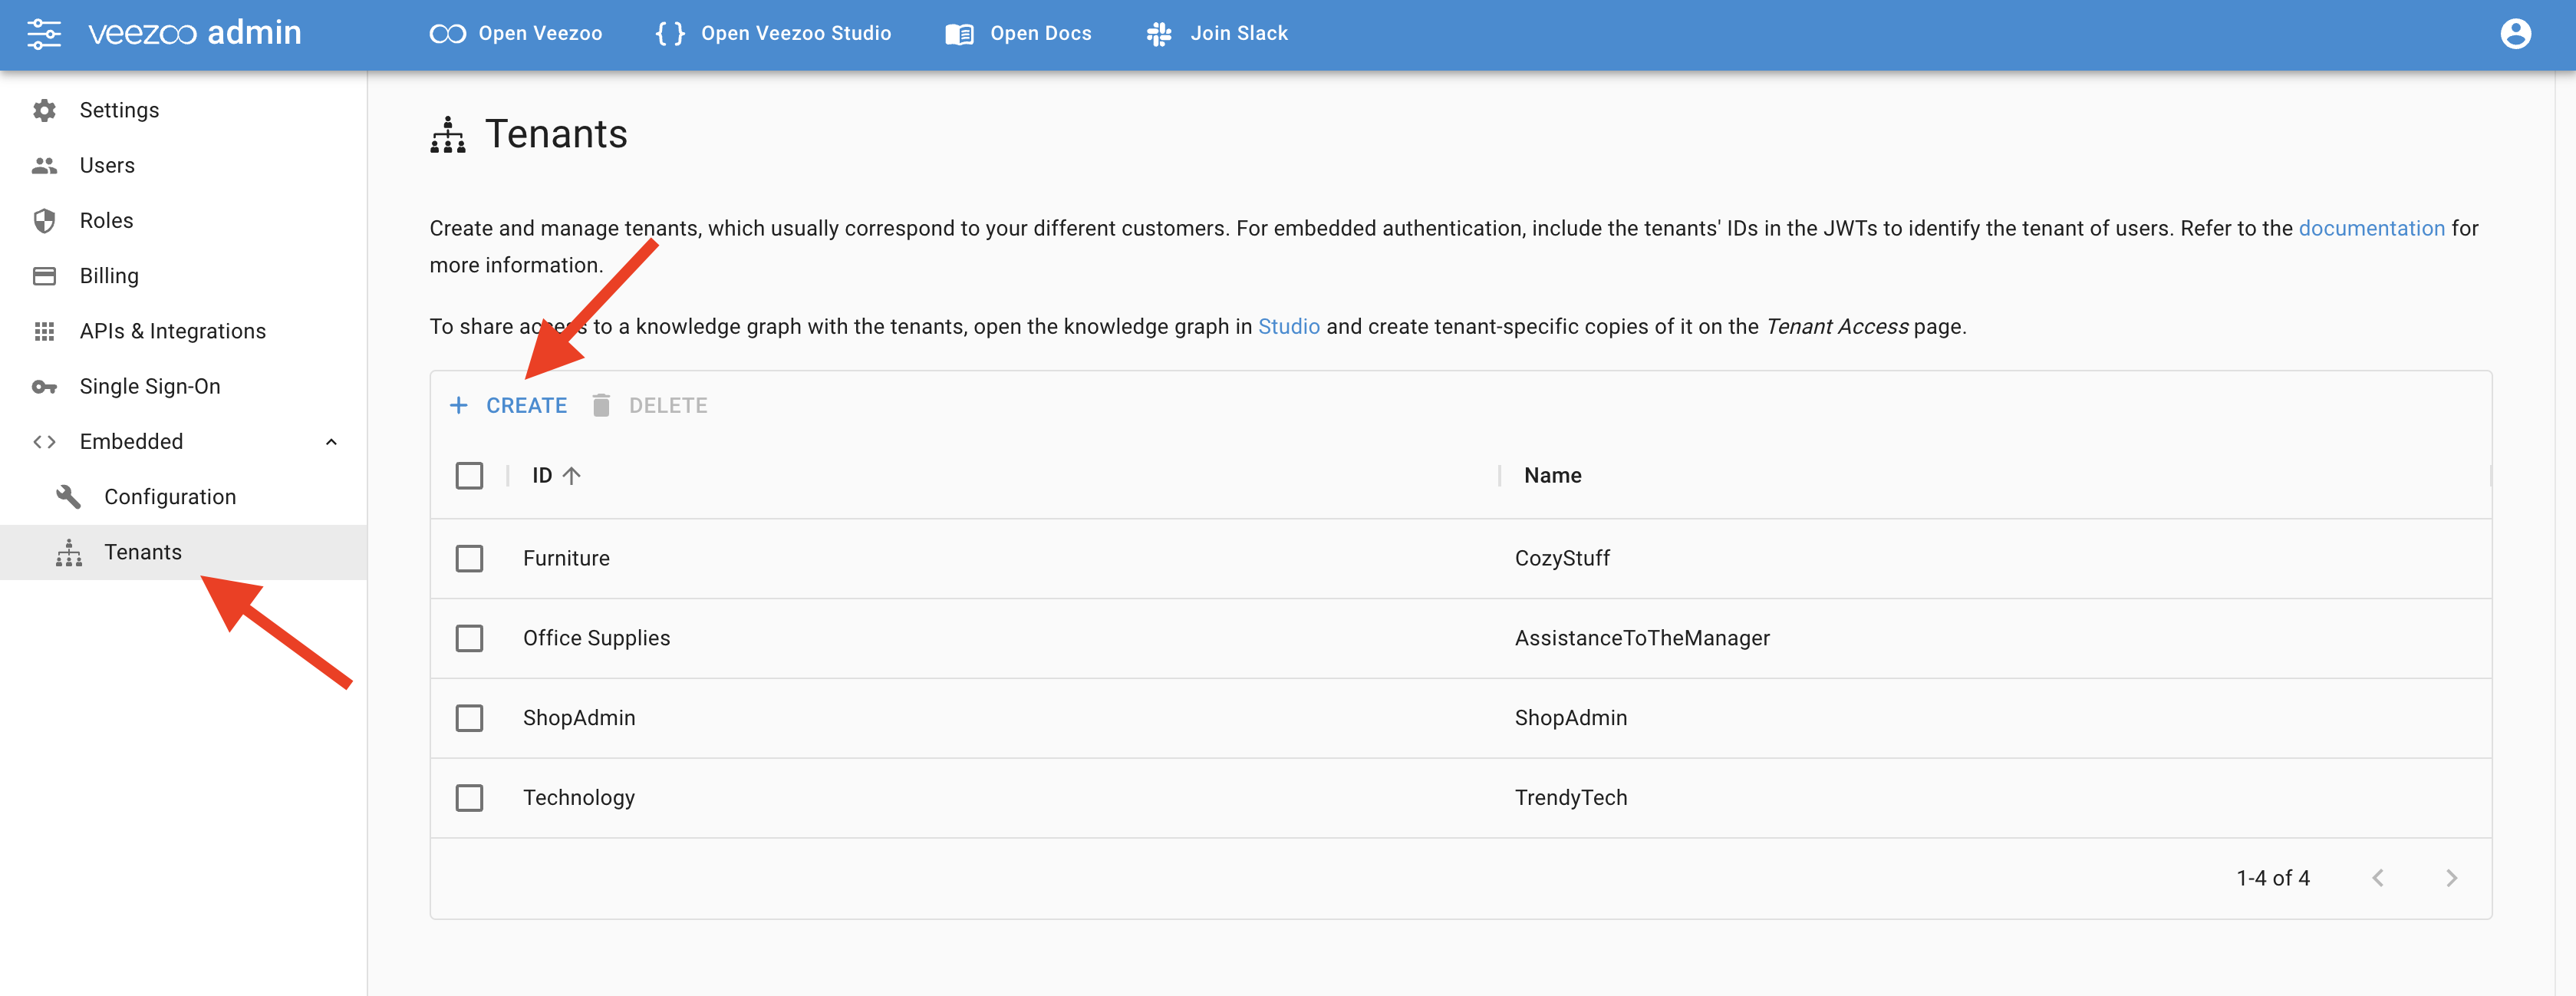
5. Create Tenants
To access Veezoo via embedding, you have to specify the tenant you are. Tenants can later be used to restrict access of users to certain parts of your data (in our example, we want vendors only to be able to access data about their own transactions). As a start, we will create 4 of them.
In Veezoo Admin, navigate to Embedded >> Tenants, click on CREATE.
Set the ID and name "shop_admin" and click on CREATE.
Create 3 additional tenants:
- ID "furniture" with Name "CozyStuff"
- ID "office_supplies" with Name "AssistanceToTheManager"
- ID "technology" with Name "TrendyTech"
 studio-tenant-variables.png
These represent an Admin of Hyperstore (who will see everything) and the three vendors. We now have to grant these tenants access to a specific knowledge graph.
Open Veezoo Studio and select the hyperstore knowledge graph you created earlier and click on Tenant Access.
Click on CREATE to add all your newly created tenants.
Click on the pen-icon, set the variables for the default tenant and ShopAdmin to 0, Furniture to 1, Office Supplies to 2 and Technology to 3.
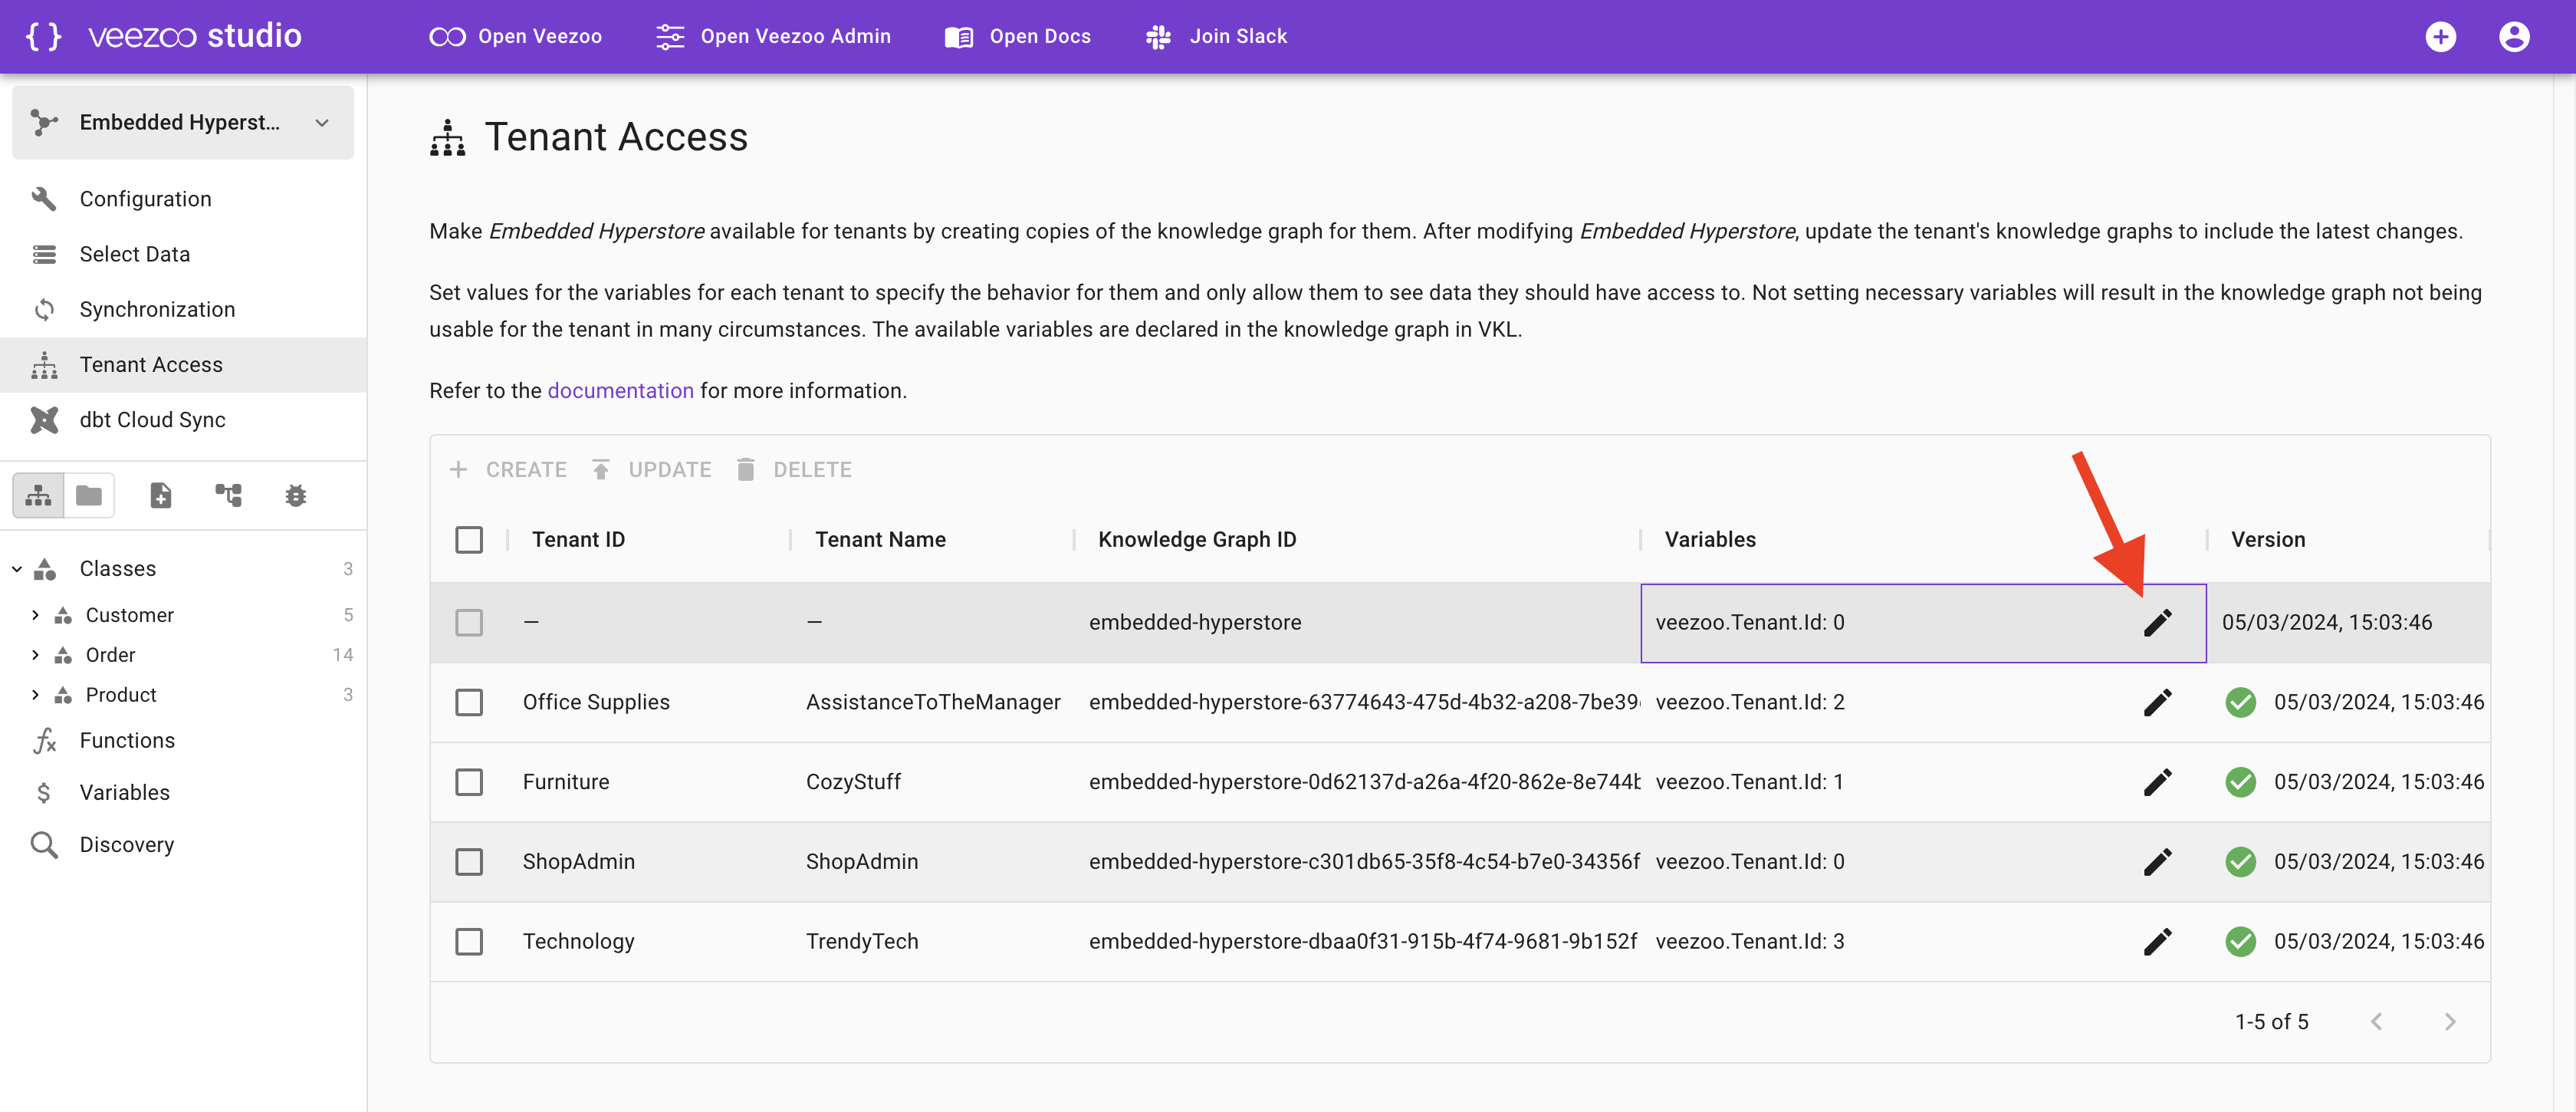
Veezoo is now ready for embedding.
6. Setting up the Local Website
The website is created using Python Flask. First, install the libraries cryptography, pyjwt, and uuid with pip. To locally run the website, there are a couple of things you have to change in the code.
Open the
app.pyfile. Insert your private key where it says "INSERT PRIVATE KEY HERE". This is the one you previously created and corresponds to the public key you added to Veezoo.Take a look at the functions
Admin(),Flavia(),Oliver()andTom(). Here we have to adjust the URLs. In the second to last line of each function it currently says:veezoo_url = f"https://embedded-demo.app.veezoo.com?jwt={jwt}&embedded=true"Take a look at Veezoo in your browsers and check what the domain is. It should be something like
<yourname>.app.veezoo.com/.... Back in the python code, changeembedded-demoin each function to whatever<yourname>is.Open the four HTML files
Admin.html,Flavia.html,Oliver.htmlandTom.html.In each file, there are two places in the code where it says
https://embedded-demo.app.veezoo.com. Change every instance tohttps://<yourname>.app.veezoo.com.
You are now ready to run the code. When you do so, you can open a browser and go to http://127.0.0.1:5000/ to see your newly created website. If you are using Chrome (which I recommend), I would suggest you open a guest-tab (click on your profile in the top right corner, click on "guest"), otherwise you have to clear your cookies every time you open Veezoo Studio again.
On the page, you should see on the top right a Sign in! button. Click on it and choose a user. You can now enjoy the full embedded Veezoo experience.
As this is a demo site, most buttons are for decoration, but if you click on Dashboards you will see an overview of this user's dashboards. You can display them by clicking on them. As in regular Veezoo, you can create new dashboards in the chat, which then will also show up here. These boards are visible only be visible to the user who created them (just like regular Veezoo).
7. Limiting access and Virtual Tables
So far we have four users on our website. They all can create their own boards, but we want to go a bit further. The main advantage of having different tenants (and not just different users) is to limit their access to the database, which is what we are going to do next.
The next steps are pretty specific to the Hyperstore database. If you are using your own, you can of course still follow along, but of course you won't be able to copy everything 1:1.
As mentioned above, three of our four tenants represent different vendors who use our Hyperstore platform to sell their products. We would like to restrict their access to the database, such that they can only see their products, orders of their products and customers who have bought their products. Veezoo offers two ways to restrict access: Authorization over Virtual Tables and Authorization over Database Connection. In this demo, we are going to use Virtual Tables. If you are interested Authorization over Database Connection, you can find more information about it in the general embedding guide
In Veezoo, we can create Variables associated with tenants, which then can be used in the SQL. By default, each tenant already has a veezoo.Tenant.Id variable, with the ID you configured earlier. With these we will restrict the access.
Virtual tables are more like views, and in this case we use it to hide the unrestricted access of the underlying table. Instead of accessing the Customer table directly, we use this extra SQL code to filter out data we don't want the tenant to see.
To create the virtual tables, open Veezoo Studio and click on the folder icon (hovering over it displays the text "Show the file tree").
Within the database folder (not the knowledge-base folder!) find the folder labeled Product and open the
table.ttlfile. It should look something like this:
db.storage.embedded_hyperstore.public {
    table Product {
        identifier: "Product"


        column Category {
            identifier: "Category"
            primitive_type: "text"
        }
...
(The first line might look slightly different, but that doesn't matter and we aren't going to change it) Change it to this:
db.storage.embedded_hyperstore.public {
    virtual_table Product {
        identifier: "Product"
        virtual_table_sql:
         """
             SELECT
                 *
             FROM
                 "Product" p
             WHERE
                 p."Provider ID" = ${quote(veezoo.Tenant.Id)}
             OR
                 ${quote(veezoo.Tenant.Id)} = 0
            """


        column Category {
            identifier: "Category"
            primitive_type: "text"
        }
...
Now, when you ask questions about the product, the virtual_table_sql will be executed first, using the Tenant ID. For example as a Technology Shop tenant with ID = 3 you will only see products with Provider ID = 3 (which in our example are all the products that are in the "Technology" Category). The OR clause is added so that the Admin user can see everything.
- In a similar fashion, change the
table.ttlfiles within the Customer and Order folders. Order:
db.storage.embedded_hyperstore.public {
    virtual_table Order {
        identifier: "Order"
        virtual_table_sql:
         """
             SELECT
                 o.*
             FROM
                 "Order" o
             JOIN
                 "Product" p
             ON
                 o."Product ID" = p."Product ID"
             WHERE
                 p."Provider ID" = ${quote(veezoo.Tenant.Id)}
             OR
                 ${quote(veezoo.Tenant.Id)} = 0
            """
...
and Customer:
db.storage.embedded_hyperstore.public {
    virtual_table Customer {
        identifier: "Customer"
        virtual_table_sql:
         """
             SELECT DISTINCT
                 c.*
             FROM
                 "Customer" c
             JOIN
                 "Order" o
             ON
                 c."Customer ID" = o."Customer ID"
             JOIN
                 "Product" p
             ON
                 o."Product ID" = p."Product ID"
             WHERE
                 p."Provider ID" = ${quote(veezoo.Tenant.Id)}
             OR
                 ${quote(veezoo.Tenant.Id)} = 0
            """
...
This is already everything we need to add. Save the changes. Now we need to update the tenants knowledge graph.
In Veezoo Studio, go to Tenant Access, select all tenants and click on UPDATE.
The last thing we need to do, is to give the default user (you, when you access this knowledge graph via regular Veezoo) a
veezoo.Tenant.Idvalue (right now you would get error messages in the chat, since the SQL code now uses this variable). Click on the pencil icon in the top row (the one without Tenant ID or Name) and set the ID to 0.
If you now open the chat in your demo website again, you will get different results for different users. To see this clearly, type "Products" and you will see that all of the displayed ones have the same Category (except of course you are logged in with the Admin account).
Congratulations, you are all done!